Welcome -
Saturday, October 30, 2010
DUE DATES
ART 2&3 - You all have a few more weeks to work on the cardboard replicas of modes of transportation. We will probably go until Thanksgiving holidays, maybe extend it to right before Christmas break. Don't procrastinate!! Some of you are far behind. If you haven't acquired multiple example photos from the Internet of your vehicle of choice, then you are behind already. You should already have the skeletal core of your creation put together. There is no particular method for creating these replicas, just that you have to be clever and use your noggin when deciphering how to recreate your photos into the cardboard structure. It's going to require some ingenuity on your part. Good luck - Mr. Kelley
Sunday, October 3, 2010
ALL CLASSES
Wednesday, September 29, 2010
New for October
Step 1 - In your sketchbook brainstorm for several motif ideas. These should vary in value, some looking darker than others; some looking lighter. This will be determined by the amount of shading you choose to do in each motif. These motifs will be used to create the larger pattern
Step 2 - Now choose between 5 and 7 motifs that were approved by me in class. Cut out the ones with which you choose to work. Now spend a few minutes arranging and rearranging these cut-outs until you find a desirable sequence. When you're happy with the order, carefully flip them over in place and run a strip of tape along the backside to keep them permanently together.
Step 3 - Draw a 1 inch border around your project paper (you received it in class). Now lightly draw a 1 inch grid inside the border. THIS SHOULD BE DONE LIGHTLY! We will erase all the pencil lines when you finish the entire project, so done draw the grid very dark.
Step 4 - Now, using the light boxes in class, lay your cut-outs underneath your grid paper and line them up with the top-left corner of your paper. With the light box on, you should clearly see through your grid paper to the cut-outs. Once aligned, tape your grid paper down in the top 2 corners only (you'll need to be able to flip the paper up to move the cut-outs, so don't tape all the corners).
Step 5 - Now you're ready to trace what you see. Carefully redraw your cut-out motifs onto the grid paper. KEEP YOUR PENCIL MARKS AS LIGHT AS POSSIBLE!
Step 6 - Continue tracing your cut-outs and moving them down so that they fill in the next set of empty squares.
Step 7-Notice how I move the cut-outs over one grid square with each new row. This prevents the same motif of being repeated within the same column. It also creates a cool diagonal effect in the pattern.
Step 8- Continue tracing and realigning the cut-outs until you have filled in the whole sheet of grid paper. You should have a lightly draw pattern, ready for you to begin using your felt-tip pen for shading and re-drawing. I'll have the original drawing in class which is used in this post for you to examine. Work hard and be careful. - Mr. Kelley
Tuesday, September 21, 2010
Pattern Projects and New Due dates
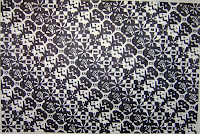
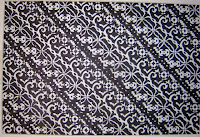 Examples of Pattern Project (7th grade) - each individual square has a different pattern inside it, just like the patterns you are to create for your homework. When we repeat those patterns they become motifs. Click on the images to enlarge.
Friday, September 10, 2010
7th Grade Hand Drawings
These Projects will be due on September 21st (Tuesday)
Thursday, September 2, 2010
Hand Drawings - Seeing Contours
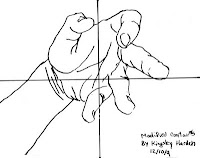
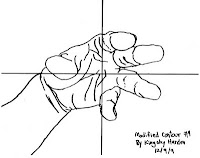
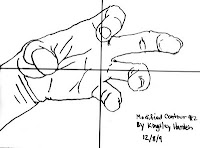
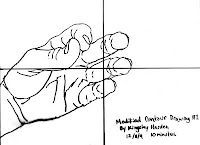 (click on each image to view larger)
Thursday, August 19, 2010
Art 2&3 - Project details and Homework
Thanks to everyone for bringing your email addresses with your parent's signatures. I'm plugging them in on the blog as you read this.
Be ready to paint on Tuesday. See you then - Mr. Kelley
PS - CLICK HERE to see some past Duck stamp winners.
7th grade - Project #1: Value Studies - DUE Aug.31st
 Example of finished Project. Rows (top to bottom) = hatching, cross-hatching, stippling, initial, blending
Your first project is dealing with Value and Line. As mentioned in class, there are several methods of achieving value with lines. Here are the ways we covered (study these terms and definitions....they will probably show up in a Quiz)
Hatching - The use of one set of parallel lines to create values. Click Here to see examples
Cross-Hatching - The use of multiple sets of parallel lines, which cross over each other, to create values Click Here to see examples
Stippling (Pointillism) - The use of dots, dashes, or points to create value Click Here to see examples
Blending - A method of creating flawless transitions between values by smudging the values together.
Your project is to draw 5 rows on your paper that I gave you in class. Each row should be 1x12 inches. (See example above) Use only ONE shading method in each row. Do not combine shading methods. Start with the darkest values on the left and end up with just white paper on the right. For the stippling row you may use a Sharpie marker to save time (see example). On the Blending row you may use your finger or a Q-Tip to "smear" your lines. I can help you with this in class. Look at the examples given and contact me if you have questions. Remember - the most important thing is to have good craftsmanship; no smudges outside the rows and no creases in the paper. Clean your paper after you've finished shading by erasing all unwanted marks. Good luck.
PS - Bring your syllabus stubs with your parent's signature and an email address. Also bring your Sketchbook, mechanical pencils, and felt-tipped pen. Remember - it's 2pts off your project grade each time you don't bring your supplies to class.
Tuesday, August 17, 2010
NEW YEAR - Welcome Class
First things first - Everyone needs to have their sketchbooks, pencils, and pens starting Thursday. THESE ARE MUST-HAVES IN EVER CLASS; DON'T FORGET THEM.
Also, 7th graders: I will be bringing poster board on Thursday for you to make your own portfolios. I'll be showing you how to do this.
Art 2&3: be looking for a paper portfolio at the arts stores around town. It's best to use a coupon to make this purchase. Don't get the leather portfolios unless you plan on being an artist for life....they are very pricey. If you really need to save some money, just buy two sheets of poster board and tape them together, leaving one of the longest sides open so that you can put your art in it. Some of you made these last year. Remember: Your portfolio has to be large enough to hold an 18x24 sheet of paper. Have these ready by next week and bring them to class on Tuesday.
Also - here is the link to see the Duck Stamp species. Look up each species that sounds interesting to you and print out three images that you'd like to use. Have the "color" print outs in class Thursday (black and white copies won't help you). http://www.fws.gov/juniorduck/ArtContest.htm#GeneralInformation
If any of you have questions please send them to me through this blog or my email: jaredkelley@bellsouth.net
HOMEWORK - bring signed syllabus stub with email addresses on Thursday.
Wednesday, April 7, 2010
PROJECTS and HOMEWORK

 Example of Egg study for homework
 Example of creating a portrait starting with the highlights. Click to enlarge.
ART1&2 - Above you will find examples of your homework assignment and your current in-class final project. First the homework: Draw 5 egg sketches. You should setup your egg on a flat surface under a light source, like a desk lamp. Tone your sketchbook paper like we have been doing in class using the side of your pencil and a paper towel. Now erase the highlights on the egg and the light areas of the background. Move onto adding darker shadows until you have a finished egg study which resembles the egg you set up to look at. You need 5 different egg drawings. Make sure you have crisp lines for the edges of the egg and shadows.
Wednesday, March 24, 2010
Homework Due March 31
- The 5 perception skills of drawing consist of - the perception of edges, the perception of spaces, the perception of relationships, the perception of lights and shadows, and the perception of the whole.
- The forms in a composition which are the subject matter and which catch the viewer's eye first.
- The basic unit is a simple shape which is used to begin a complex drawing and which can be used to figure correct proportions and placement.
- The particular shape of a drawing or painting surface. The length and width of a drawing or painting surface.
- A contour is always the border (edge) of two things simultaneously.
- Composition consists of three parts - 1:positive shapes 2:negative spaces 3:format
Study these items and be ready for the quiz. We will be working on self portraits in class.
ART 3 - continue working on your still life projects. Bring all supplies to class (charcoal, white conte, and red pastel pencils, paper, and photo reference.) You will lose 5pts from your final project grade for not bringing your materials to class starting on March 31st.
Sunday, February 28, 2010
Homework Due March 3, 2010
 Step 1: find a good section of trees that have no leaves so that you can easily see the branches. You can choose to draw the most interesting section of the tree(s) if you'd like. Notice how the image above is cropped so that the branches fill the whole format. I don't want to see the trunks of the trees; just the branches and where they intersect.
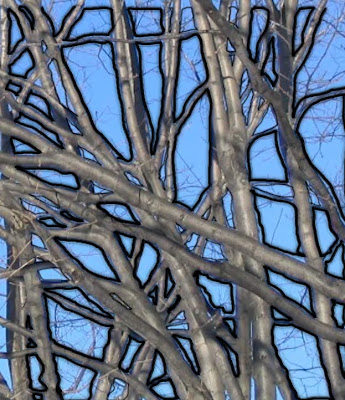 Step 2: Now that you have found the section of the tree that you'd like to draw in your sketchbook, visualize the negative areas in your mind. Pay close attention to every "open" space between the branches; these are the negative spaces which you will be drawing. I suggest focusing on the medium to large sized branches and ignoring the "twigs".
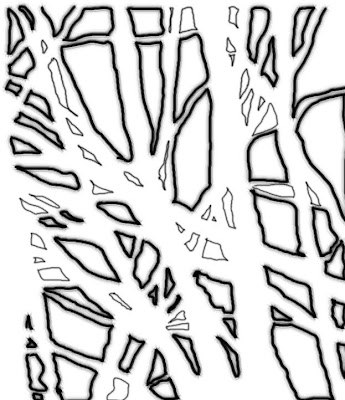
Step 3: In your sketchbook, begin drawing the negative spaces as they appear in the trees you are drawing. Take your time and make sure that every negative space that you draw is accurate in shape and size to the real thing. You should have something similar to the example above. Notice that you will begin to "draw" the tree without really drawing the tree.
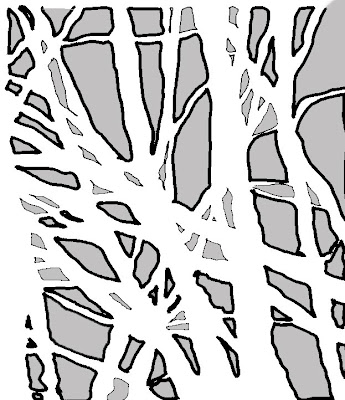 Step 4: After you have drawn all the major negative spaces and filled your sketchbook paper, you may choose to go back into your drawing and shade the negative areas. This will add contrast and further separate the trees from the background which you drew. Good luck - Mr. Kelley
ART 3 - We are starting our still life drawings on Wednesday. You are to bring one object to class from your home which represents your personality. It must be small enough to carry to school and large enough to be easily seen in the still life setup which I will have in class.
Friday, February 19, 2010
Homework Due Feb. 24, 2010
ART 3 - No homework. New project discussion will be next class.
Wednesday, February 10, 2010
Homework & Projects Due - Feb. 17, 2010
Art 2 - You are to complete 2 new Picture Plane drawings: 1) a new hand position and 2) a landscape or still life. A still life can be anything inanimate, like a floral arrangement, car, fabric, anything. Simply hold the Picture Plane up at eye-level and at arm's length and move it around until you find a pleasing composition inside the Picture Plane opening. Once you find a good composition, carefully trace it with the marker while keeping your head still and one eye closed. Tone the paper, erase, and shade after copying the Picture Plane drawing to your paper. Please use the cross hairs we discussed in class to copy from transparency to paper.
Art 3 - Your scratch boards are due Wednesday. Continue working on them over the week. If you have any questions or problems (attn: Mr. Newton) contact me immediately. I won't have sympathy on you if it is obvious that you wasted the entire week due to some small issue. Good luck - Mr. Kelley
Wednesday, February 3, 2010
Picutre Plane Drawings
You are using a literal "picture plane" for your next projects. Your first assignment using the picture plane is to draw your hand. Please read below and follow the steps I have listed.
Fig. 3 The line drawing has been traced to the paper using pencil
Step 4: Now tone the entire composition using the side of your pencil lead. After you tone the entire composition area, use a paper towel or Kleenex to blend all your pencil shading. You should notice that everything evens out to a fairly equal tone. (If your drawing was too light to begin with then this is the step where you will notice it disappearing as you blend with the paper towel. )
Fig. 4 Tone the entire composition with graphite and then blend with a paper towel
Step:5 You are now ready to begin "removing" the highlights. At this point you will need to first do two things: 1) tape your paper to the table top so that it won't move while you work and 2) get your hand back into the exact position it was in earlier for your Picture Plane tracing. Now look closely at any area that has light touching it. Think of your toned paper as the middle value and anything lighter that should be erased slightly. Be careful not to completely erase your contour lines; you are simply showing which parts of your hand have light hitting them. You may also show where the light hits the background like in the example below.
Fig. 5 Show highlights by carefully erasing the light areas of your hand and background
Step 6: The last step is to now add all the darker shadows in the appropriate areas. This is why it is important to keep your free hand in the same position that you selected earlier. You must look carefully at every detail on your hand. Ask yourselves "Which wrinkles appear to be the darkest?" "Where are the shadows/highlights on my fingers?" "Does my shading look accurate to what is really on my hand?" This is the final step and the point in which you should do your most diligent work. Take your time, work carefully and stand back when your finished to see how you did. I want to see that you spent time on this - not that you rushed through it on Tuesday night.
Homework Due Feb 10, 2010
Art 2 - Your homework assignment is the same as the Art 1 class except that you must select 2 of your 5 Picture Plane drawings to shade in the same manner in which you shaded your hand in class. For the steps to shading please see the next post entitled "Picture Plane Drawings"
Saturday, January 30, 2010
Homework Due Feb. 3, 2010
Thursday, January 28, 2010
Homework Due Feb. 3, 2010
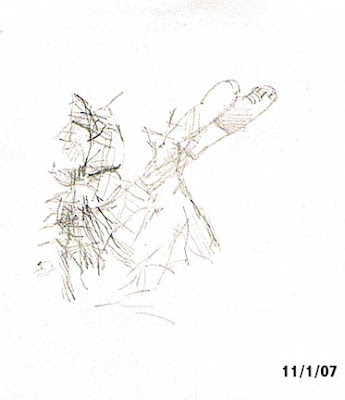
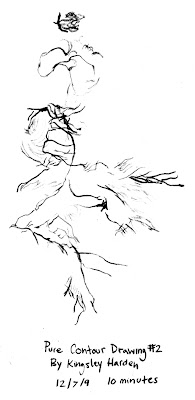
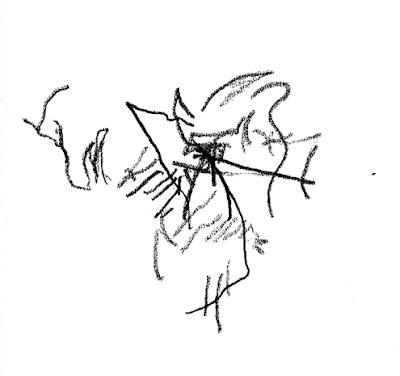
Your 5 Pure contour drawings must be the following: 1-crumpled piece of paper, 1-shoe, 2-hand with wrinkled palm, and 1- freebie (you choose an object to draw).
Remember that you must NOT look at your hand while you draw. You must have 10 minutes of uninterrupted time so retire to a quiet room in your house where you will not be disturbed. Pick a point near the center of your object to start with. Now look for a line near or on that point (remember your wrinkles in your hand) and follow that line, or edge, with your eye. Slowly and carefully move your pencil in your drawing hand in the same direction as your as your eyes. Do not let your eyes move faster than your pencil and do not let your pencil draw more than what your eyes are looking at. Your finished drawing should resemble these examples. Good Luck - Mr. Kelley
Thursday, January 21, 2010
Homework - Due on Jan. 27th
Art 3 - Homework involves completely drawing out your composition for the scratchboard on a sheet of paper at ACTUAL SIZE OF YOUR SCRATCHBOARD. Just a line drawing...no shading. Next, shade the entire back of your drawing (flip the drawing over to the blank side of the paper) with your pencil. Don't press so hard that you tear your paper, but the more shading the better. Now place the drawing on your scratchboard with the shaded side touching the black scratchboard surface. Tape the drawing to the board. Now trace over your drawing, pressing firmly. If you do this properly you will transfer the drawing to the scratchboard. When you are finished tracing everything, remove the paper and verify that you can see all the lines from your drawing on the scratchboard. You are now ready to start your scratching. DO NOT SCRATCH THE LINES OF THE DRAWING ON YOUR BOARD UNLESS THOSE LINES ARE WHITE IN YOUR PICTURE!!!! Scratch the different areas of your composition according to the appropriate values as seen in your photographs. The lines of the drawing are just guiding marks for your convenience. Good luck - Mr. KElley
Wednesday, January 13, 2010
Figure Drawing Project
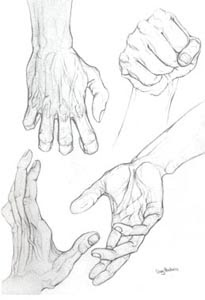
Homework: You should have two drawings of your hand and your feet (or foot) for class on 20th. Draw these in your sketchbook. One hand and foot should be in contour lines. The other hand and foot may be either gesture drawings or a mixture of contour lines and shading. Each drawing should fill ONE WHOLE PAGE in your skectchbook. (see pics above for good examples of sketches)
Wednesday, January 6, 2010
New Semester
ART 3 = Homework due 1/13/10: Bring an 8x10" (or larger) scratch board to class. You can find these at Hobby Lobby...however Hobby Lobby only carries 2 of every size at any given time. So I will try to bring a couple with me to class on Wednesday just in case. Before you go click here to print a discount coupon for the scratch board. Also, you need to take pictures of River Region architecture and scenery for the Draw Montgomery competition which is your next project. Click here to review the requirements for this competition. HAVE YOUR PHOTOS READY FOR CLASS!
ART 1&2 = Bring your portfolios and sketchbooks to class. Those of you who left your Perspective projects at home during the critique need to bring them to class so that I can grade them. If you are one of the ones who is turning in your projects late and you don't want to lose 15pts, please have your parents sign a note stating that you were finished with your project before our class on 1/5/10 and that you simply forgot to bring it to class. If they will vouch for you then you will be spared the 15pt deduction on your grade. We will be discussing your next project in class.
Tuesday, January 5, 2010
Project #2 DUE Wed. 1/6/10
For those of you who entered a "turkey and videogame induced coma" for the entire break and still haven't finished your projects, don't forget that you may turn in your projects late. You lose 15 points for every week late. This is better than a zero!
Projects - ART 1&2 = Perspective Drawing
ART 3 = Color Scales


