
Welcome -
This blog is here for Cornerstone Christian Academy art students to use as a tutorial and troubleshooting site for the completion of their various yearly projects. Use this blog to find periodic updates and tips. Please leave comments: ask questions, comment on your progress, or leave helpful tips for your fellow classmates to read regarding a particular class project. Good Luck!
Wednesday, September 29, 2010
New for October
Art 1 (7th grade) - Your new project is the Pattern Project. Here's the step by step. If you have any questions please contact me...... BUT LISTEN WHEN I GIVE YOU COUNSEL. DO NOT ASK ME THE SAME QUESTION MULTIPLE TIMES!!!! You all are driving me up the wall with your lack of attention.
Step 1 - In your sketchbook brainstorm for several motif ideas. These should vary in value, some looking darker than others; some looking lighter. This will be determined by the amount of shading you choose to do in each motif. These motifs will be used to create the larger pattern
Step 2 - Now choose between 5 and 7 motifs that were approved by me in class. Cut out the ones with which you choose to work. Now spend a few minutes arranging and rearranging these cut-outs until you find a desirable sequence. When you're happy with the order, carefully flip them over in place and run a strip of tape along the backside to keep them permanently together.
Step 3 - Draw a 1 inch border around your project paper (you received it in class). Now lightly draw a 1 inch grid inside the border. THIS SHOULD BE DONE LIGHTLY! We will erase all the pencil lines when you finish the entire project, so done draw the grid very dark.
Step 4 - Now, using the light boxes in class, lay your cut-outs underneath your grid paper and line them up with the top-left corner of your paper. With the light box on, you should clearly see through your grid paper to the cut-outs. Once aligned, tape your grid paper down in the top 2 corners only (you'll need to be able to flip the paper up to move the cut-outs, so don't tape all the corners).
Step 5 - Now you're ready to trace what you see. Carefully redraw your cut-out motifs onto the grid paper. KEEP YOUR PENCIL MARKS AS LIGHT AS POSSIBLE!
Step 6 - Continue tracing your cut-outs and moving them down so that they fill in the next set of empty squares.
Step 7-Notice how I move the cut-outs over one grid square with each new row. This prevents the same motif of being repeated within the same column. It also creates a cool diagonal effect in the pattern.
Step 8- Continue tracing and realigning the cut-outs until you have filled in the whole sheet of grid paper. You should have a lightly draw pattern, ready for you to begin using your felt-tip pen for shading and re-drawing. I'll have the original drawing in class which is used in this post for you to examine. Work hard and be careful. - Mr. Kelley
Tuesday, September 21, 2010
Pattern Projects and New Due dates
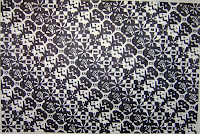
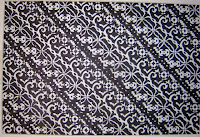 Examples of Pattern Project (7th grade) - each individual square has a different pattern inside it, just like the patterns you are to create for your homework. When we repeat those patterns they become motifs. Click on the images to enlarge.
7th grade - Your new project will incorporate what you have learned about lines and how to create them. You'll be using patterns to create motifs. A motif is a sequence of images or a design which repeats, over and over again. In order to create the motif you have to first create the pieces to your motif. This is your homework assignment which is Due Thursday, 9/23/10.
You must create a minimum of 20 different patterns. You should draw each of these patters in your sketch book in 1 inch squares. Draw patterns that have overall dark, light, and in-between values. To decide whether your pattern is light or dark or something in the middle, look at your small pattern from across the room so that it's hard to see the details. What you'll notice from far away is your patterns value - either light or dark. Try doing this while you complete some of your patterns. You'll need some light valued patterns and some dark valued patterns for this project. Good luck.
Art 3 - Your Duck stamp paintings are due at the end of class Thursday, 9/23/10. You all have done very well but don't quit before your painting is complete. Detail, detail, detail - that's what is going to make your duck stand out. Add extra colors where possible, like in the reflections in the water. We will discuss the new project in class on Tuesday. See you in class - Mr. Kelley
Friday, September 10, 2010
7th Grade Hand Drawings
7th Graders: You started your Picture Plane Project drawings in class on Thursday. Several of you refused to listen carefully in class when I repeated each step several times. The last post on this blog gave you a link for ALL the steps that you are to take to do this project correctly. If you have questions on the steps, refer to this post. For all other issues that do not deal with questions like "What do I do next?" you may email me or call me and I will help you solve the issue. Once again, do not contact me if you are confused about the steps of the project - I will simply tell you to check this blog post.
These Projects will be due on September 21st (Tuesday)
These Projects will be due on September 21st (Tuesday)
Thursday, September 2, 2010
Hand Drawings - Seeing Contours
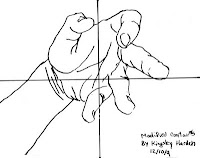
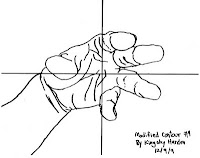
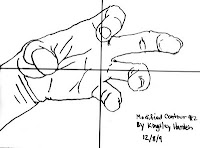
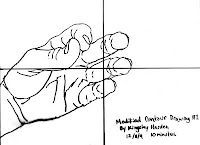 (click on each image to view larger)
7th Grade - Your homework over the weekend is to do 10 different hand drawings using the picture frame (aka=Picture Plane) that I gave you. Here is the link to the step-by-step http://cccafinearts.blogspot.com/2010/02/picutre-plane-drawings.html
IMPORTANT: Only do steps 1-3 in the link! Do not do ANY shading of the hand drawings. We will do this in class.
Your 10 final drawings in your sketchbook should look like the images in this post. I want to see every edge in your hand. That means wrinkles, shadow lines and highlight lines, and anything else that forms a line or shape on your hand. Talk to me if you have problems. Good luck - Mr. Kelley
Subscribe to:
Comments (Atom)

