Welcome -

This blog is here for Cornerstone Christian Academy art students to use as a tutorial and troubleshooting site for the completion of their various yearly projects. Use this blog to find periodic updates and tips. Please leave comments: ask questions, comment on your progress, or leave helpful tips for your fellow classmates to read regarding a particular class project. Good Luck!

Sunday, February 28, 2010

Homework Due March 3, 2010

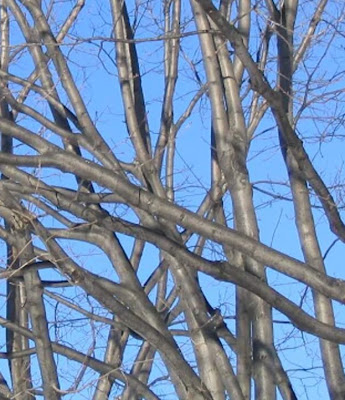
ART 1&2 - Your homework deals with negative space. As we discussed in class, negative space are the areas in a piece of art that are not the primary focus. They are the areas that are easy to ignore while you look at the subject of the art. Your assignment is to find trees around your property that have lost their leaves and you are to draw in your sketch book ONLY the negative spaces found between all the bare branches. This sketch should fill your sketchbook page. Below is an example of how to do this.

Step 1: find a good section of trees that have no leaves so that you can easily see the branches. You can choose to draw the most interesting section of the tree(s) if you'd like. Notice how the image above is cropped so that the branches fill the whole format. I don't want to see the trunks of the trees; just the branches and where they intersect.
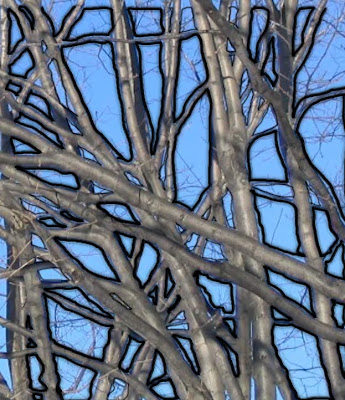
Step 2: Now that you have found the section of the tree that you'd like to draw in your sketchbook, visualize the negative areas in your mind. Pay close attention to every "open" space between the branches; these are the negative spaces which you will be drawing. I suggest focusing on the medium to large sized branches and ignoring the "twigs".
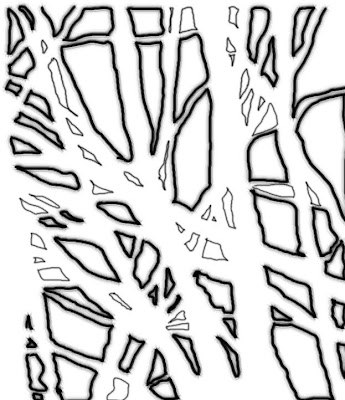

Step 3: In your sketchbook, begin drawing the negative spaces as they appear in the trees you are drawing. Take your time and make sure that every negative space that you draw is accurate in shape and size to the real thing. You should have something similar to the example above. Notice that you will begin to "draw" the tree without really drawing the tree.
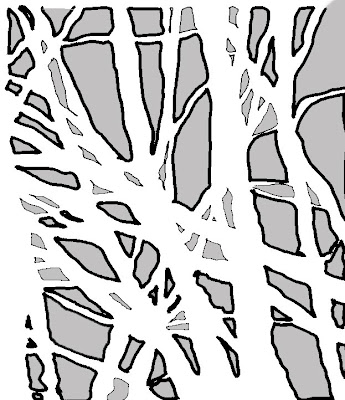
Step 4: After you have drawn all the major negative spaces and filled your sketchbook paper, you may choose to go back into your drawing and shade the negative areas. This will add contrast and further separate the trees from the background which you drew. Good luck - Mr. Kelley


ART 3 - We are starting our still life drawings on Wednesday. You are to bring one object to class from your home which represents your personality. It must be small enough to carry to school and large enough to be easily seen in the still life setup which I will have in class.

Friday, February 19, 2010

Homework Due Feb. 24, 2010

ART 1&2 - Your homework is to purchase a mirror for self portraits. You can find $1 mirrors at the Dollar Tree. IT MUST BE LARGE ENOUGH FOR YOU TO SEE YOUR ENTIRE HEAD IN IT WHILE HOLDING IT AT ARM'S LENGTH. Dollar Tree, and even Dollar General, has mirrors that are this large. Write your name on the back with permanent marker and bring to class on Wednesday.

ART 3 - No homework. New project discussion will be next class.

Wednesday, February 10, 2010

Homework & Projects Due - Feb. 17, 2010

Art 1 - Your homework is to complete 2 new hand drawings using the Picture Plane tool. These must include shading. Do not repeat the same hand position more than once. It is key that you follow the instruction posted last week without any deviation! I expect to see EVERY detail in your hand! Don't generalize what you see; DRAW only what you see. Remember: If you have a picture frame at home which is the same size as your Picture Plane opening or larger, you may use the glass from the picture frame to draw on instead of the flimsy transparency you received in class. This is MUCH better and easier when tracing your hand underneath because the glass won't shift under the marker as you trace. These two drawings will be a part of your Project grade along with the one you finished from last week. We will critique the drawings on Wednesday. Gook Luck

Art 2 - You are to complete 2 new Picture Plane drawings: 1) a new hand position and 2) a landscape or still life. A still life can be anything inanimate, like a floral arrangement, car, fabric, anything. Simply hold the Picture Plane up at eye-level and at arm's length and move it around until you find a pleasing composition inside the Picture Plane opening. Once you find a good composition, carefully trace it with the marker while keeping your head still and one eye closed. Tone the paper, erase, and shade after copying the Picture Plane drawing to your paper. Please use the cross hairs we discussed in class to copy from transparency to paper.

Art 3 - Your scratch boards are due Wednesday. Continue working on them over the week. If you have any questions or problems (attn: Mr. Newton) contact me immediately. I won't have sympathy on you if it is obvious that you wasted the entire week due to some small issue. Good luck - Mr. Kelley

Wednesday, February 3, 2010

Picutre Plane Drawings

The Picture Plane is a visual tool which artists employ in order to realistically draw or paint three dimensional things on a two dimensional surface like paper or canvas while retaining a 3-D appearance.

You are using a literal "picture plane" for your next projects. Your first assignment using the picture plane is to draw your hand. Please read below and follow the steps I have listed.

Fig.1 Select a hand position to trace.
Step 1: First select an interesting hand position to draw. This must be a position that will allow you to balance the Picture Plane; using the back of your hand, for example, may not work as well as using your fingers. Do not draw your palm simply held flat with all fingers extended; you must create a unique hand position.
Step 2: Now close one eye and hold your head completely still. With one eye closed, use the wet erase marker which you received in class to trace every detail and line that you see inside the Picture Plane opening (background included)


Fig.2 Example of finished line drawing on the Picture Plane
Step 3: You next need to trace your line drawing to your paper. To do this, remove the transparency from the Picture Plane carefully. Now place your clean sheet of sketchbook paper on top of the line drawing. Now hold them both up to a window with plenty of sunlight coming through and re-trace the line drawing onto the paper using your PENCIL. You should be able to easily see the line drawing behind the paper when you hold them both up to the window. Make sure that your marks on your paper are dark - this is important... no faint lines that are hard to see! Draw the Picture Plane opening around your line drawing (see below)

Fig. 3 The line drawing has been traced to the paper using pencil

Step 4: Now tone the entire composition using the side of your pencil lead. After you tone the entire composition area, use a paper towel or Kleenex to blend all your pencil shading. You should notice that everything evens out to a fairly equal tone. (If your drawing was too light to begin with then this is the step where you will notice it disappearing as you blend with the paper towel. )

Fig. 4 Tone the entire composition with graphite and then blend with a paper towel

Step:5 You are now ready to begin "removing" the highlights. At this point you will need to first do two things: 1) tape your paper to the table top so that it won't move while you work and 2) get your hand back into the exact position it was in earlier for your Picture Plane tracing. Now look closely at any area that has light touching it. Think of your toned paper as the middle value and anything lighter that should be erased slightly. Be careful not to completely erase your contour lines; you are simply showing which parts of your hand have light hitting them. You may also show where the light hits the background like in the example below.

Fig. 5 Show highlights by carefully erasing the light areas of your hand and background

Step 6: The last step is to now add all the darker shadows in the appropriate areas. This is why it is important to keep your free hand in the same position that you selected earlier. You must look carefully at every detail on your hand. Ask yourselves "Which wrinkles appear to be the darkest?" "Where are the shadows/highlights on my fingers?" "Does my shading look accurate to what is really on my hand?" This is the final step and the point in which you should do your most diligent work. Take your time, work carefully and stand back when your finished to see how you did. I want to see that you spent time on this - not that you rushed through it on Tuesday night.


Homework Due Feb 10, 2010

Art 1 - Your homework is to complete the hand drawing that you started in class using the Picture Plane which you were handed. (A separate post will detail the steps you need to take for this project.) Also, you must create 5 new Picture Plane line drawings. Hold the picture plane up to any scene around your house/neighborhood or balance it on/against any object (like your hand or another object) and use the marker from class to trace everything that you see in the picture plane. REMEMBER: YOU MUST CLOSE ONE EYE WHILE DRAWING AND KEEP YOUR HEAD STILL UNTIL YOU FINISH! Do not do any shading; just line drawing. Draw every detail.

Art 2 - Your homework assignment is the same as the Art 1 class except that you must select 2 of your 5 Picture Plane drawings to shade in the same manner in which you shaded your hand in class. For the steps to shading please see the next post entitled "Picture Plane Drawings"