Welcome -

This blog is here for Cornerstone Christian Academy art students to use as a tutorial and troubleshooting site for the completion of their various yearly projects. Use this blog to find periodic updates and tips. Please leave comments: ask questions, comment on your progress, or leave helpful tips for your fellow classmates to read regarding a particular class project. Good Luck!

Showing posts with label assignment. Show all posts

Wednesday, April 7, 2010

PROJECTS and HOMEWORK


Example of Egg study for homework

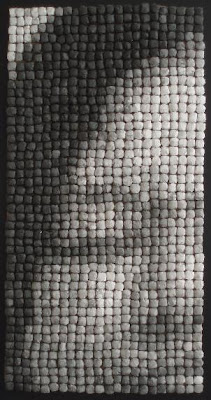
Example of creating a portrait starting with the highlights. Click to enlarge.

ART1&2 - Above you will find examples of your homework assignment and your current in-class final project. First the homework: Draw 5 egg sketches. You should setup your egg on a flat surface under a light source, like a desk lamp. Tone your sketchbook paper like we have been doing in class using the side of your pencil and a paper towel. Now erase the highlights on the egg and the light areas of the background. Move onto adding darker shadows until you have a finished egg study which resembles the egg you set up to look at. You need 5 different egg drawings. Make sure you have crisp lines for the edges of the egg and shadows.
You'll also see an example of the portrait drawings you are doing in class. I have posted a few images of a preliminary sketch I recently did for a client. The methods I am teaching you in class are the very methods that I use in my own art which I have found to be the most effective. You'll see that I tone the paper and then erase the lights and highlights in the face to begin. Afterwards I begin adding the darker shadows until satisfied. I sometimes add very light pencil marks after erasing the highlights to clarify the facial features. This is similar to how you completed your hand drawings a few weeks ago using the picture plane.
ART3 - Continue working on your striped fabric drawings. Gentleman: Suzanna has showed you how it's done. Her drawing is looking great and all because ..... she's actually working on it. As I mentioned in class, if there are any of you who would rather take a written exam as your final rather than doing this project I will allow you to do so. The condition is that you spend your art class time in the office studying for the exam or working on assignments for other subjects. The exam will be roughly 25 questions and I will make sure you have a study guide beforehand. It will only be worth a maximum of 45% of your "project" grade. You must let me know before the 14th if you wish to take this route.

Wednesday, February 10, 2010

Homework & Projects Due - Feb. 17, 2010

Art 1 - Your homework is to complete 2 new hand drawings using the Picture Plane tool. These must include shading. Do not repeat the same hand position more than once. It is key that you follow the instruction posted last week without any deviation! I expect to see EVERY detail in your hand! Don't generalize what you see; DRAW only what you see. Remember: If you have a picture frame at home which is the same size as your Picture Plane opening or larger, you may use the glass from the picture frame to draw on instead of the flimsy transparency you received in class. This is MUCH better and easier when tracing your hand underneath because the glass won't shift under the marker as you trace. These two drawings will be a part of your Project grade along with the one you finished from last week. We will critique the drawings on Wednesday. Gook Luck

Art 2 - You are to complete 2 new Picture Plane drawings: 1) a new hand position and 2) a landscape or still life. A still life can be anything inanimate, like a floral arrangement, car, fabric, anything. Simply hold the Picture Plane up at eye-level and at arm's length and move it around until you find a pleasing composition inside the Picture Plane opening. Once you find a good composition, carefully trace it with the marker while keeping your head still and one eye closed. Tone the paper, erase, and shade after copying the Picture Plane drawing to your paper. Please use the cross hairs we discussed in class to copy from transparency to paper.

Art 3 - Your scratch boards are due Wednesday. Continue working on them over the week. If you have any questions or problems (attn: Mr. Newton) contact me immediately. I won't have sympathy on you if it is obvious that you wasted the entire week due to some small issue. Good luck - Mr. Kelley

Wednesday, February 3, 2010

Picutre Plane Drawings

The Picture Plane is a visual tool which artists employ in order to realistically draw or paint three dimensional things on a two dimensional surface like paper or canvas while retaining a 3-D appearance.

You are using a literal "picture plane" for your next projects. Your first assignment using the picture plane is to draw your hand. Please read below and follow the steps I have listed.

Fig.1 Select a hand position to trace.
Step 1: First select an interesting hand position to draw. This must be a position that will allow you to balance the Picture Plane; using the back of your hand, for example, may not work as well as using your fingers. Do not draw your palm simply held flat with all fingers extended; you must create a unique hand position.
Step 2: Now close one eye and hold your head completely still. With one eye closed, use the wet erase marker which you received in class to trace every detail and line that you see inside the Picture Plane opening (background included)


Fig.2 Example of finished line drawing on the Picture Plane
Step 3: You next need to trace your line drawing to your paper. To do this, remove the transparency from the Picture Plane carefully. Now place your clean sheet of sketchbook paper on top of the line drawing. Now hold them both up to a window with plenty of sunlight coming through and re-trace the line drawing onto the paper using your PENCIL. You should be able to easily see the line drawing behind the paper when you hold them both up to the window. Make sure that your marks on your paper are dark - this is important... no faint lines that are hard to see! Draw the Picture Plane opening around your line drawing (see below)

Fig. 3 The line drawing has been traced to the paper using pencil

Step 4: Now tone the entire composition using the side of your pencil lead. After you tone the entire composition area, use a paper towel or Kleenex to blend all your pencil shading. You should notice that everything evens out to a fairly equal tone. (If your drawing was too light to begin with then this is the step where you will notice it disappearing as you blend with the paper towel. )

Fig. 4 Tone the entire composition with graphite and then blend with a paper towel

Step:5 You are now ready to begin "removing" the highlights. At this point you will need to first do two things: 1) tape your paper to the table top so that it won't move while you work and 2) get your hand back into the exact position it was in earlier for your Picture Plane tracing. Now look closely at any area that has light touching it. Think of your toned paper as the middle value and anything lighter that should be erased slightly. Be careful not to completely erase your contour lines; you are simply showing which parts of your hand have light hitting them. You may also show where the light hits the background like in the example below.

Fig. 5 Show highlights by carefully erasing the light areas of your hand and background

Step 6: The last step is to now add all the darker shadows in the appropriate areas. This is why it is important to keep your free hand in the same position that you selected earlier. You must look carefully at every detail on your hand. Ask yourselves "Which wrinkles appear to be the darkest?" "Where are the shadows/highlights on my fingers?" "Does my shading look accurate to what is really on my hand?" This is the final step and the point in which you should do your most diligent work. Take your time, work carefully and stand back when your finished to see how you did. I want to see that you spent time on this - not that you rushed through it on Tuesday night.


Wednesday, January 13, 2010

Figure Drawing Project


Examples of good Contour Line and Gesture drawings
Your new project assignment will involve completing many gesture drawings, contour line drawings and a few drawings rendered with shading. We will be completing most of this project in class, however you will also have additional homework assignments involving the techniques which you will learn in class. Gesture Drawings are quick sketches which illustrate basic shapes and forms along with their placement. You should be able to complete a gesture drawing in 30 seconds at the end of this project. There are no details in gesture drawings; only general shapes. Gesture drawings are a quick way to "map" out a compositional idea. If want to draw a group of objects, for example, but aren't sure which objects to include or where they should be placed on your art surface, you can quickly sketch the basic forms in your sketchbook to decide between several different possibilities. This allows you to see different compositions without spending a lot of time on small details.
Contour Line drawings are more detailed but do not include shading, generally. A contour line follows the perimeter of a shape. When you are using contour lines to draw the figure in class, you will have to show where shadows, wrinkles, folds, highlights, and other details are, such as fingers and facial features. You should not work too fast so that you can pay close attention to the lines found within the subject. You will usually draw contour lines atop gesture drawings. We will do several 1-5 minute contour line drawings.
Lastly, we will spend a couple weeks completing drawings which go from gesture drawing to contour line drawing to a drawing which has shading all in one. These more thorough drawings will be used as your final pieces to be graded.

Homework: You should have two drawings of your hand and your feet (or foot) for class on 20th. Draw these in your sketchbook. One hand and foot should be in contour lines. The other hand and foot may be either gesture drawings or a mixture of contour lines and shading. Each drawing should fill ONE WHOLE PAGE in your skectchbook. (see pics above for good examples of sketches)

Tuesday, January 5, 2010

Project #2 DUE Wed. 1/6/10

I hope everyone had a great Christmas break. Remember to bring your projects to class for a critique tomorrow (1/6/10). I hope that the extra couple of weeks helped many of you.

For those of you who entered a "turkey and videogame induced coma" for the entire break and still haven't finished your projects, don't forget that you may turn in your projects late. You lose 15 points for every week late. This is better than a zero!

Projects - ART 1&2 = Perspective Drawing
ART 3 = Color Scales

Sunday, November 15, 2009

Perspective Drawings - Art 1&2

Example of lines receding into a vanishing point.
Example of 1pt perspective

Example of 2 pt perspective


Example of 2pt perspective landscape.


Art 1&2

Perspective Drawing assignment - Your project is to create a composition illustrating 1 point and 2 point perspectives. Your composition should depict a fantasy landscape. In this imaginary landscape you may have various shapes such as circles, squares, and other original shapes much like buildings. Your drawing must have these few items:

a horizon line, minimum 3 objects above the horizon line, minimum 3 objects below the horizon line, and minimum 2 objects directly in front of the horizon line.


Art 2 - art 2 students will have to create the same drawing as above PLUS a second drawing showing a minimum of 6 objects rendered in 3-point perspective.


All projects will be due before the Christmas break.

Color Scale and Value Study- Art 3

Art 3

Color Scale - Your homework since the last class has been to research different way to create a color scale. We reviewed a few traditional methods of creating color scales including a COLOR WHEEL. We also saw some very complex designs that appeared to be 3-dimensional.

Project: You will have to create a color chart and a value scale. I asked you to put together a few sketches of different color scale designs for your project. The only thing you are required to include are 3 primary colors (red,blue,yellow), 3 secondary colors (violet, orange, and green), and 6 tertiary (yellow-green, blue-green, blue-violet, red-violet, red-orange, yellow-orange).
The value scale will be a series of 12 one inch squares which show a smooth transition from black to white.
Both the color scale you select and the value study will be completed using tempura or acrylic paints. Be ready to start on Wednesday by having your color scale designs ready to show me. We will have these complete before the Christmas holidays.

Wednesday, October 21, 2009

New DEADLINES for Project 1

I have changed the deadline for all classes for the first project.

Art 1 & 2
Draw Montgomery Project due OCT. 28th!
We will be holding a critique on that day as well. Remember that I have instituted a NEW POLICY in Art 1&2: If you forget to bring your supplies to class (sketchbook, portfolio, current project, etc.) you will lose 2 points from your class average.
IMPORTANT: You may purchase an 8x10" scratchboard from Hobby Lobby or Baker's Art Supply to use for your final. These are much better quality than the paper I gave you. Just reprint your photo reference to 8x10" and color the back of it with graphite pencil so that you can trace the photo to the scratchboard. OR... just use your sketchbook sketch of your photo to trace onto the scratchboard. Email me or call me if you have any questions. Good luck.
Art 3
Wildlife Projects due OCT 28th.
Also, your vocabulary quiz will be on OCT 28th. (See vocabulary post below)
Remember to layer several colors over each other where possible on your drawings. The more color variety, the better! Don't forget to use your white color pencil to blend multiple colors into each other. Don't let your brain convince you that everything is just one color. In fact, I gamble to say that your set of color pencils doesn't have ONE color that is 100% accurate to your photo reference. One way to test this theory is to put the area you have just colored as close to the corresponding area in the photo as possible and look at the difference in color. Try it.
Everyone (AKA Mr. Newton) should be walking away from their art project every 10-15 minutes and looking at it from across the room. This will let you know if you have enough value contrast; if you don't then it will be difficult to see all the small elements of your subject matter and everything will appear to "blend" together. Also...NO SHARPIE MARKERS!!!! Good luck - Mr. Kelley

Monday, October 12, 2009

1st Project Deadlines

Art 3 - Wildlife Projects
As we discussed last class, your wildlife projects are to be 9x12"and in colored pencil. I handed each of you a sheet of Bristol paper for you to use. REMEMBER: you must use a separate background image in your own design that is different from the background in your animal photograph unless you are using a photograph that you personally shot.
Steps :
1 - Sketch your selected photograph in your sketchbook. You will produce your final version on a 9x12" piece of Bristol paper so make your sketch as close to 9x12" as possible to save you from having to redraw it later to a larger scale.
2 - Flip your sketch over and cover the back with a layer of graphite. I would use a wood pencil for this, not a mechanical, and I would do all the shading with the side of the lead not the point. This will allow you to cover the back with graphite much faster.
3 - now place the sketch with your drawing side up over the Bristol paper. Make sure that you secure the sketch to the Bristol paper with a couple pieces of tape to prevent the sketch from moving on top of the Bristol paper.
4 - Now trace the lines of the original sketch, applying a little more pressure than normal. You may want to trace with a colored pencil so that you can see which areas of your sketch you have traced as you go. You should peel up the corner of your sketch periodically, being careful not to shift the sketch on the Bristol paper, and check to see if the graphite back is transferring the lines you are making with your colored pencil. If not, then use more pressure or you have not applied enough graphite to the back of your sketch and may have to re-shade the entire back and try to trace again.
  • After this you should have a perfect duplicate of your original sketch on your new Bristol paper. You may have to redraw a few marks to make them easier to see on the Bristol paper but otherwise you are ready to start coloring your composition.
All Projects DUE OCT. 21
PS - If you want to spend a few bucks to make this easier, you can purchase TRANSFER PAPER from Hobby Lobby in the drawing section. This is paper that has one side already coated in a layer of graphite. Simple place this paper with the graphite coated side touching the Bristol paper and then place your sketch face up on top of the transfer paper and begin tracing. Remember not to let your papers shift and move.
Please email me if you have more questions. Good luck - Mr. Kelley

Thursday, September 17, 2009

Assignments and Homework

Art I:
HOMEWORK - You should bring three pictures to class of Downtown and/or Riverwalk Architecture. I will help you decide which image will be the most successful for our Scratch Paper project. These will be used for the Draw Montgomery Competition in April. Here is what the Draw Montgomery website says about what to use for the contest:
Entrants are encouraged to use the wealth of historic buildings and architectural styles found in and around the Montgomery Downtown and Riverfront areas. We encourage participants to look carefully at our city and creatively interpret what they see, while conveying awareness of good design and its impact.

YOU NEED A MINIMUM OF 3 PHOTOS FOR YOUR HOMEWORK GRADE.
We will make the scratch paper ourselves and we will transfer your drawing of the building to the scratch paper. You will then scratch away the black surface of the Scratch Paper to reveal the white poster board underneath.
Art 1 students will use 11x14" paper.
Art 2 students (Zach and Adrianna) can chose to use 16x20" or 18x24" paper.

Draw Montgomery Contest - Click Here.
ART 3
Homework- students are required to find 3 pictures of the wildlife option of their choice. Remember that we talked about three possible contests this year which will use Alabama wildlife.
Here are the various contests:
1) William R. Ireland Youth Wildlife Art Contest - Click Here
2) Federal Duck Stamp Contest - Click Here
3) National State-Fish Art Contest - Click Here
You should decide which of these that you'd like to enter and then choose the appropriate photo references (3 minimum) and then you must choose 3 habitat images to use in the final project. These habitats must be appropriate for the species that you elected to paint/draw. So no bullfrogs in the Himalayan Mountains.

Wednesday, April 22, 2009

Wire Sculpture Figurines


Wire Gesture Sculptures
Objectives: Students will:
*Learn about Human proportion
*Discuss the Principle- Balance- in relation to 3-dimensional forms
*Learn about gesture sketching, as well as action poses.

Materials:
*18 gauge aluminum wire
*2x4’s cut into squares, or other object for bases. (We will use a heavy duty stapler to attach figures to base)
*Wire cutters
*Twist-eez colored wire, or telephone/cable wires (optional)

Motivation:
*Students will draw from life - then turn one of their sketches into a three dimensional work of art.

Procedure
*Begin by discussing proportion in the human body- how long the arms and legs are, how wide is the torso, how many heads are in a body, etc. Also discuss the joints- neck, shoulders, elbows, wrists, knees, hips, ankles.
*Talk about movement and action within a person. What are interesting actions, or movement? Bring up dancing, sports, etc.
*Have students think of several different ideas for an action pose, to use for their sculpture.
Get students warmed up by discussing and practicing gesture sketches- so they get the basic ideas of the body.
*To begin, the students start with the body part touching the base (the foot - if the figure is standing).
*From the foot the student’s need to create a “bone.”
*The bone will go up to the hip, and then the students will create “muscle” (wrapping the wire down the bone, and back up to end at the hip).
*Students then create a hip to go to the other leg, create a bone, foot and then muscle. *Create a spine, then wrap the muscle down the spine, and backup to end at the neck. Remember to compare your figure's proportions; the torso should be wider in size than the legs, as it is in real life.
*This continues for the whole body, and then the students make the head last.
*Tuck the end of the wire into the body.

Critique work - discuss work of Alexander Calder and contemporary wire sculpture - Compare and contrast student work to the work of Calder and others.
This will be the last project due before summer break. I will post the exact deadline later.
Talk to me if there are any problems. DON'T WAIT UNTIL THE LAST MINUTE!!!!
-Mr. Kelley

Saturday, January 10, 2009

Sculpture Project Using Recycled Items

We have a new project to go with the new year. We will be moving on from 2-D works to 3-D pieces. Our first project will incorporate recylced items (aka Trash). I have decided to change this project just a little bit and allow you to create a sculpture that is representational OR abstract. So, just to be clear, you can create something we instantly recognize like a coffee mug or a tree; or you can make a sculpture that is an unrecognizable shape yet still interesting. If you chose to do something representational, like the coffee mug, make it out of a material that is unrealistic, like cardboard or cotton balls. Here are a few examples of recycled art:

Cardboard guitar by Chris Gilmour

Michelle Stitzlein butterflies

Graphite on recycled Starbucks cups by Phil Hansen

Recycled crumpled paper dipped in ink by Phil Hansen

Recycled leaves held together by thorns by Andy Goldsworthy

Recycled stones, broken and scratched by Andy Goldsworthy


Here Are the Requirements:

1. Your project must be made 100% from recycled materials. Use whatever you want as long as it is not brand new or store bought. Use leafs, wood, discarded furniture, old mechanical parts, aluminum cans, etc.

2. You must be able to display your project in the classroom. So a life sized creation of a popscicle stick T-Rex would be out of the question. If you cannot transport it then you cannot do it for a grade.

3. Create at least 10 detailed sketches in your sketchbook of what you would like to make. List what your materials would be and how they will be applied (i.e. glue, epoxy putty [great for metal-on-metal], nails, tape, string) Have a sketched approved by me by Thursday, Jan 15th!!!

4. Begin working on project. All sculptures are DUE FEB 19TH!


Tuesday, December 9, 2008

Colored Pencil Portraits Using the GRID

Birth of Venus by Botticelli (detail)
As you all know already, we have been working on the colored pencil portraits. This is the next level of our GRID studies. The grid will enable anyone to draw a highly accurate representation of anything they desire. Some of you have realized how difficult is can be to create a portrait without the aid of a grid. It pays to spend the extra time necessary to layout a grid! This should be light handed so that it doesn't show up after you're finished coloring.

Use colors expressively! If you want to throw in a little bit of a crazy color - GO FOR IT! I will never penalize you for experimenting, even if you realize that it was not successful. So don't worry about a bad result; just be ready to explain WHY you chose to do what you did when we have our critique.

REMEMBER: THESE ARE DUE ON DEC. 11 UNLESS I SEE REMARKABLE EFFORT IN WHICH CASE I WILL EXTEND THE DUE DATE UNTIL AFTER THE CHRISTMAS BREAK.